Showing posts with label Browser Helper Object (BHO). Show all posts

Monday, June 13, 2011

How to Create a Toolbar with XUL

The first time that I was asked to make a toolbar for Firefox my first thought was, "sounds like fun!"  However, I didn’t have a clue about where to start and how to find the information about it.  I wrote this post to share my experience and help anybody who finds himself in a similar situation

Toolset

For this tutorial is recommended that you have the following software installed:
Firefox 3.6 or later
Extension Developer (ADD-ONS for Firefox)
Visual Studio 2008 or 2010
Text Editor


How to Create a Toolbar with XUL
To create a toolbar we will use the following,
  • toolbox: A box that contains toolbars.
  • toolbar: A single toolbar that contains toolbar items such as buttons.
  • toolbarbutton: A button on a toolbar, which has all the same features of a regular button but is usually drawn differently.
  • toolbarseparator:  Creates a separator between groups of toolbar items.
  • toolbarspring: A flexible space between toolbar items.
  • menu: Despite the name, this is actually only the title of the menu on the menubar/toolbar. This element can be placed on a menubar/toolbar or can be placed separately.  
  • menupopup: The popup box that appears when you click on the menu title. This box contains the list of menu commands.
  • menuitem: An individual command on a menu. This would be placed in a menupopup.
  • menuseparator: A separator bar on a menu. This would be placed in a menupopup.
To start, do the following,
Open Firefox
Open Real-time XUL Editor of Extension Developer or any page of XUL Edit online like (e.g., http://ted.mielczarek.org/code/mozilla/xuledit/index.html)

Copy the following source,

<?xml-stylesheet href="chrome://global/skin/" type="text/css"?>
  <toolbox>
    <toolbar>
      <toolbarbutton tooltiptext="tooltiptext1" oncommand="functionJS_1()" label="LabelButton1"/>
      <toolbarseparator/>
      <toolbarbutton tooltiptext="tooltiptext2" oncommand="functionJS_2()" label="LabelButton2"/>
      <toolbarbutton tooltiptext="tooltiptextN" oncommand="functionJS_N()" label="LabelButtonN"/>
      <toolbarspring/>
      <menu label="LabelMenu" tooltiptext="tooltiptextMenu">
        <menupopup>
          <menuitem label="LabelMenuitemCheckbox1" type="checkbox"/>
          <menuitem label="LabelMenuitemCheckbox2" type="checkbox"/>
          <menuitem label="LabelMenuitem" oncommand="functionMenuitem();"/>
        </menupopup>
      </menu>
      <toolbarseparator/>
      <menu label="Help" tooltiptext="About this toolbar">
        <menupopup>
          <menuitem label="Visit blog of nearsoft" oncommand="OpenNS();"/>
          <menuseparator/>
          <menuitem label="About this toolbar"/>
        </menupopup>
      </menu>      
    </toolbar>
  </toolbox>
</window>

After you paste the source on the XUL Editor it will show you the preview, which will look like this,

Read more: closerisbetter

Tuesday, April 12, 2011

Browser Helper Objects for Windows Explorer

Both Windows Explorer and Internet Explorer are able to load extensions known as Browser Helper Objects (BHOs). BHOs are a minimal extensibility point into both the shell and the browser, allowing extensions to sync to events and react accordingly. For instance, the Mouse Gestures add-on is a BHO designed for IE, while Groove implements a BHO designed to add functionality to the Windows Explorer shell.

Back in the IE6 timeframe, when Windows Explorer could actually host the Web Browser control and render web pages, developers might often want their BHO to load in both Windows Explorer and Internet Explorer. In cases where Developers didn’t want their BHO to load in Windows Explorer, they could simply write a registry key named NoExplorer to prevent their BHO from being loaded into Windows Explorer. A developer who wanted to write a BHO that loaded only in Windows Explorer and not in IE had to do more work—in their DLLMain function, they’d have to get the module handle of the running executable and bail out of doing more work if they found they were running inside iexplore.exe (sample code). That wasn’t great for performance, since the DLL itself must begin loading in order to determine where it is being hosted.

Thursday, January 20, 2011

Internet Explorer 9 to bolster security with ActiveX content filter

ie9-acx.jpg

Sure, you can wade through Internet Explorer 8's security settings and flip a number of radio buttons to change ActiveX permissions in its many zones, but it's kind of a pain in the butt. It's also not also flexible a system as it could be -- but Microsoft appears ready to change all that in Internet Explorer 9.
Read more: DownloadSquad

Tuesday, November 30, 2010

Writing a Managed Internet Explorer Extension: Part 4–Debugging

7041.debuggerattach_5F00_thumb_5F00_32559525.png

Picking up where we left of with Writing a Managed Internet Explorer Extension, debugging is where I wanted to go next. I promise I’ll get to more “feature” level stuff, but when stuff goes wrong, and it will, you need to know how to use your toolset. .NET Developers typically write some code and press F5 to see it work. When an exception, the debugger, already attached, steps up to the plate and tells you everything that is wrong. When you write an Internet Explorer Extension it isn’t as simple as that. You need to attach the debugger to an existing process, and even then it won’t treat you like you’re use to. Notably, breakpoints aren’t going to launch the debugger until the debugger is already attached. So we have a few options, and some tricks up our sleeves, to get the debugger to aide us.

Explicit “Breakpoints”
The simplest way to emulate a breakpoint is to put the following code in there:

System.Diagnostics.Debugger.Break()

Think of that as a breakpoint that is baked into your code. One thing to note if you’ve never used it before is that the Break method has a [Conditional(“DEBUG”)] attribute on it – so it’ll only work if you are compiling in Debug. When this code gets hit, a fault will occur. It will ask you if you want to close, or attach a debugger. Now is your opportunity to say “I want a debugger!” and attach.
It’ll look like just a normal Internet Explorer crash, but if you probe at the details, “Problem Signature 09” will tell you if it’s a break. When working on a BHO, check this every time IE “crashes” – it’s very easy to forget that these are in there. It’s also important that you compile in Release mode when releasing to ensure none of these sneak out into the wild. The user isn’t going to look at the details and say, “Oh it’s just a breakpoint. I’ll attach and hit ‘continue’ and everything will be OK”. Once that’s done, choose Visual Studio as your debugger of choice (more on that later) and you should feel close to home.

Read more: vcsjones

Tuesday, November 16, 2010

Writing a Managed Internet Explorer Extension

I’ve recently had the pleasure of writing an Internet Explorer add on. I found this to somewhat difficult for a few reasons and decided to document my findings here.
Managed vs Native
One difficult decision I had to make even before I had to write a single line of code was what do I write it with? I am a C# developer, and would prefer to stay in that world if possible. However, this add-on had the intention of being use commercially, and couldn’t make the decision solely based on preference.
Add-on’s to Internet Explorer are called Browser Helper Objects, often documented as BHOs as well. They are COM types, thus if we were going to do this managed, we will be doing some COM Interop. I’ve done this before, but mostly from a level of tinkering or deciding to go back to native. The .NET Framework had another benefit to me, and that was WPF. My BHO requires an user interface, and doing that natively isn’t as easy or elegant as using native libraries. Ultimately I decided to go with .NET Framework 4.0, and I can only recommend the .NET Framework 4.
Previous versions of the CLR has a serious drawback when exposing the types to COM: They always used the latest version of the CLR on the machine. If you wrote a BHO in the .NET Framework 1.1, and 2.0 was installed, it would load the assembly using the .NET Framework 2.0. This can lead to unexpected behavior. Starting in the .NET Framework 4, COM Visible types are guaranteed to run against the CLR they were compile with.
The Basics of COM and IE
Internet Explorer uses COM as it’s means of extending its functionality. Using .NET, we can create managed types and expose them to COM and Internet Explorer would be non-the-wiser. COM heavily uses Interfaces to provide functionality. Our BHO will be a single class that implements a COM interface. Let’s start by making a single C# Class Library in Visual Studio. Before we can start writing code, we need to let the compiler know we will be generating COM types. This is done by setting the “Register Assembly for COM Interop” in our project settings on the “Build” tab. While you are on the Build tab, change the Platform target to “x86” as we will only be dealing with 32-bit IE if you are running a 64-bit OS. Now that’s out of the way, let’s make our first class. We’ll call our class BHO.
namespace IeAddOnDemo
{
public class BHO
{
}
}
By itself, this class is not useful at all, and nor can COM do anything with it. We need to let COM know this type is useful to it with a few key attributes. The first is ComVisibleAttribute(true). This attribute does exactly what it looks like. The next is GuidAttribute. This is important because all COM types have a unique GUID. This must be unique per-type per application. Just make your own in Visual Studio by clicking “Tools” and “Create GUID”. Finally there is the ClassInterfaceAttribute which will be set to None. Optionally, you can set the ProgIdAttribute if you want. This allows you to specify your own named identifier that will be used when the COM type is registered. Otherwise it’s your class name. Here is what my class looks like now:
[ComVisible(true),
Guid("9AB12757-BDAF-4F9A-8DE8-413C3615590C"),
ClassInterface(ClassInterfaceType.None)]
public class BHO
{
}
Read more: vcsjones

Extending Explorer with Band Objects using .NET and Windows Forms

dotnetBandObjects.jpg

Introduction
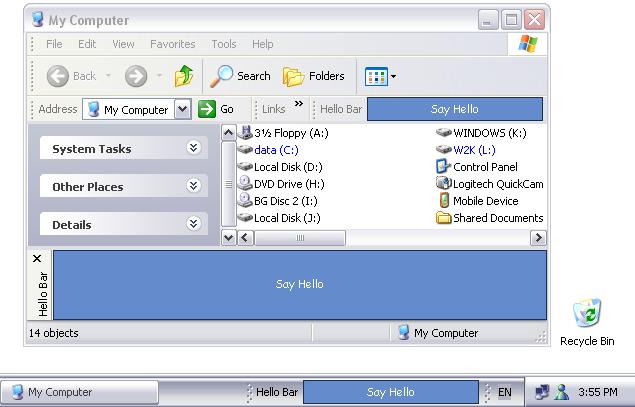
A lot has been already said about extending Windows and Internet Explorer with Band Objects, Browser Bands, Toolbar Bands and Communication Bands. So if you are familiar with COM and ATL you even might have implemented one yourself. Well, in case your were waiting for an easy way to impress your friends with something like Google Toolbar here it is - the .NET way (or should I say Windows Forms and COM Interop way?). In this tutorial I am going to show how to create any of the mentioned above Band Object types with the help of the BandObject control. Later I will also talk about some implementation details of the BandObject.
Hello World Bar step by step
1.
Build a Release version of BandObjectLib and register it in the Global Assembly Cache. The easiest way to do this is to open BandObjectLib.sln in Visual Studio, set the active configuration to Release and select 'Rebuild Solution' from the 'Build' menu. The second project in the solution - RegisterLib - is a C++ utility project that performs the 'gacutil /if BandObjectLib.dll' command that puts assembly into GAC.
As you probably already know, Band Objects are COM components. And for the .NET framework to find an assembly that implements a COM component it must be either be registered in the GAC or located in the directory of the client application. There are two possible client applications for Band Objects - explorer.exe and iexplorer.exe. Explorer is located in the windows directory and IE somewhere inside 'Program Files'. So GAC is actually the only one option in this case. Thus .NET assemblies that implement Band Objects should be registered in GAC and all libraries they depend on - like BandObjectLib.dll - should also be there.
Assemblies in the GAC must have strong names and thus key pairs are required. I have provided the BandObjects.snk file with a key pair but I encourage you to replace it with your own. See the sn.exe tool for more details.
2.
Create a new Windows Control Library project and call it SampleBars. We are going to rely on the base functionality of BandObjectLib so we have to add a reference to BandObjectLib\Relase\bin\BandObjectLib.dll. As we are developing a 'Hello World Bar', rename UserControl1.cs and the UserControl1 class inside it appropriately - into HelloWolrdBar.cs and HelloWorldBar. Also put the following lines at the beginning of HelloWorldBar.cs:
using BandObjectLib;
using System.Runtime.InteropServices;
3.
Make HelloWorldBar class inherit BandObject instead of System.Windows.Forms.UserControl
Read more: Codeproject

Writing an ActiveX Control in .NET

Software developers have used ActiveX controls on their web pages to add advanced functionality to the web experience. With my migration from a Visual Basic 6 world to a Microsoft .NET C# world, I had some question as to how I can create an ActiveX control with .NET. After some research I found out that the solution is really quite simple. Create a Windows control project in Visual Studio .NET and expose an interface to the COM world.
In this example, I will walk you through creating an ActiveX control that will show a simple user interface and accept input from a web page. This process will involve the following steps:
Create an assembly (class library project) that contains an item of type User Control.
Expose an interface for the control.
Embed the user control into a web page.
Transfer data from a web form to the control and display the data on the control.
Step 1: Create an assembly.
You can use the example provided for download, or simply create your own project from scratch. In this section I will outline everything you need to do in order to properly create your assembly.
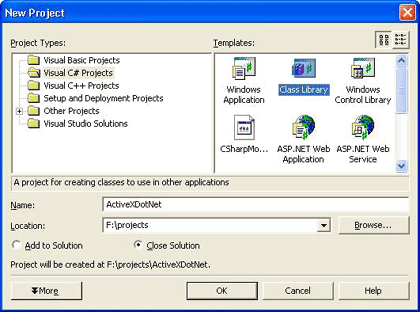
First, you create a new project of type Class Library. Name the class library ActiveXDotNet.
ActiveXImg11.gif

Read more: C# Corner

Monday, August 23, 2010

Building Browser Helper Objects with Visual Studio 2005

  This article demonstrates how to use Microsoft Visual Studio 2005 to create a simple Browser Helper Object (BHO), a Component Object Model (COM) object that implements the IObjectWithSite interface and attaches itself to Internet Explorer. This article describes how to create an entry-level BHO step-by-step. At first, the BHO displays a message that reads "Hello World!" as Internet Explorer loads a document. Then, the BHO is extended to remove images from the loaded page. This article is written for developers who want to learn how to extend the functionality of the browser and to create Web developer tools for Internet Explorer. (8 printed pages)
Read more: MSDN

How to attach to Browser Helper Object (BHO) with C# in two minutes

Introduction
Microsoft provided Browser Helper Object (BHO) to let developers "drive" Internet Explorer. The first BHO was introduced in 1997 with IE 4.0. I have been writing programs on BHO for months. It could be quite depressing at the very first beginning to learn all those things. Hereby, I am writing this article to help beginners like me get familiar with BHO as soon as possible.
Background
My personal interest is actually C++. C++ programs can be a lot less memory-consuming than C# programs. But C# does provide better service on BHO comparing to C++. My first BHO program was written in C++. It took me quite a while to figure out how to handle BHO under V C++. But C# only takes me few minutes. Meanwhile, C# has lots of pleasant designs such as foreach and type conversion.
Process
To set up a BHO Hello World Project, Lets first start a C# Class Library, as BHO is written in .dll attached to IE. You dont need a Visual Studio 2005, C# express is totally enough.
Read more: Codeproject

Browser Helper Objects: The Browser the Way You Want It

Introduction
There are sometimes circumstances in which you need a more or less specialized version of the browser. Sometimes you work around this by developing a completely custom module built on top of the WebBrowser control, complete with buttons, labels, and whatever else the user interface requires. In this case, you're free to add to that browser any new, nonstandard feature you want. But what you actually have is just a new, nonstandard browser. The WebBrowser control is just the parsing engine of the browser. This means there still remains a number of UI-related tasks for you to do: adding an address bar, toolbar, history, status bar, channels, and favorites, just to name a few. So, to create a custom browser you have to write two types of code: the code that transforms the WebBrowser control into a full-fledged browser like Microsoft Internet Explorer, and the code that implements the new features you want it to support. Wouldn't it be nice if there was a straightforward way to customize Internet Explorer instead? Browser Helper Objects (BHO) do just that.
Program Customization
Historically speaking, the first way to customize the behavior of a program was through subclassing. By this means, you could change the way a given window in a program processed messages and actually obtain a different behavior. Although considered a brute-force approach, because the victim is largely unaware of what happens, it's been the only choice for a long time.
With the advent of the Microsoft Win32 API, interprocess subclassing was discouraged and made a bit harder to code. If you're brave-hearted, however, pointers have never scared you; above all, if you're used to living in symbiosis with system-wide hooks, you might even find it too simple. But this is not always the case. Despite the cleverness of the programming, the point is that each Win32 process runs in its own address space and breaking the process boundaries is somewhat incorrect. On the other hand, there might be circumstances that require you to do this with the best of intentions. More often, customization might be a specific feature the program itself allows by design.
In the latter case, the programs search for additional modules in well-known and prefixed disk zones, load, initialize, and then leave them free to do the job they have been designed to do. This is exactly what happens with the Internet Explorer browser and its helper objects.
Read more: MSDN

Wednesday, August 04, 2010

Add-on Performance

In previous posts, we’ve written about the ways we’re making IE9 much faster, like the new script engine that uses multiple cores, and the new rendering subsystem that uses the dedicated graphics chip found on modern PCs. Another aspect of browser performance involves the external code that IE runs on behalf of users, or add-ons.
Add-ons introduce unique features that can enhance the browsing experience. However, they also decrease the browser’s performance in crucial activities like navigating to webpages and creating new tabs. In this way, add-ons affect key usage scenarios like startup and navigation.
Add-on performance is integral to an overall fast browsing experience. IE users expect the browser to be fast, with or without add-ons. We work towards several common goals with add-on developers: providing valuable features with the smallest performance and reliability impact possible (more on reliability in another post).
This blog post is the first in a series on how add-on developers can improve add-on performance. In this post, we’ll share data on the performance impact of add-ons today and how IE enables users to identify the performance impact of their add-ons and stay in control of their PCs. We’ll describe the user scenarios that are important for measuring performance and will walk through how to measure them.
We want add-on developers to have all the information they need to deliver fast, reliable add-ons that respect user choices. We want to make it clear how to test add-on performance. We ask add-on developers to start measuring add-on performance today and making their add-ons faster.
What is An Add-on?
Add-ons refer to Toolbars, Explorer Bars and Browser Helper Objects today. When add-ons are enabled in the browser, they can cause a performance impact for every tab opened and every webpage the user visits.
Another common type of extension is plug-ins, specifically ActiveX controls, like Adobe Flash, Apple QuickTime, and Microsoft Silverlight. Unlike add-ons that run in the browser across all web-pages, plug-ins run inside webpages and their performance impact is localized to the webpages that use them. The specifics of this post are about add-ons. Plug-in developers have similar opportunities to make the browsing experience faster and more reliable.
Accelerators, Webslices and Search Providers are a third class of extension. These are written in pure XML format, and were designed to not impact page or browser performance, reliability, or security.
Toolbar Buttons are another type of extension but they only impact IE’s performance when users press them and they’re mapped to an action that launches an add-on.
Understanding Add-on Performance Impact
Several studies regarding website response time report that users notice any delay over 0.2 seconds. Actions that are faster than 0.2 seconds appear instantaneous.  Scenarios with response times slower than that threshold can feel “slow” to users.
Read more: IEblog Part 1