So you’ve started to kick the tires of the Windows 8 Consumer Preview and now you are building an app. You’ve read all the UX design guidelines and started looking at some great apps on the store. Perhaps you’ve also viewed the online documentation and some samples? And you’ve likely read about the contract implementations and other charms items like custom settings.
What is Settings?
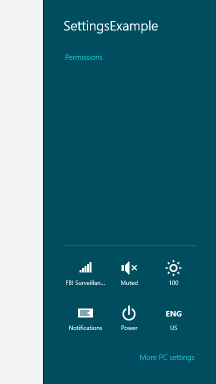
When I refer to Settings here I’m referring to that consistent experience in Metro style apps when the user invokes the charms bar and chooses settings. By default every application will respond to that Settings charm. If you do nothing you will get the default experience that you may have seen:

The text items underneath your app title are referred to as commands. Each application will always get the Permissions command. When the user clicks this they will get some “about” information on your app (name, version, publisher) as well as the permissions the app has requested. As an app developer, you have to do nothing to get this experience. In addition to that the Settings pane shows some OS-level options like volume, Wi-Fi, brightness, etc. that the user can manipulate. But you, my fellow app developer, can also implement custom settings options in your app.
The custom SettingsCommand
The first thing you have to do to customize your experience is implement a custom SettingsCommand. These are implemented by first listening to when the SettingsPane will request if there are any additional commands for the current view. Settings can be global if you have something like a “master” page setup in your XAML application, but can also be specific to a currently viewed XAML page. It is not an either/or but a both. I’ll leave the exercise up to you and your app on when you need which (or both).
Read more: Method ~ of ~ failed
QR: 